

Table of Contents
If you have an e-commerce website, you can validate shipping addresses on the front end to reduce delays and minimize costly returns due to bad addresses. Going further, you can also script and automate address validation for batch imports into UPS Worldship.
This process will only apply to addresses in the United States, since UPS can only do street level validation for US addresses.
From the UPS website:
The Address Validation Street Level API checks addresses at the street level against the United States Postal Service® (USPS) and UPS databases to determine valid addresses in the United States and Puerto Rico.
IMPORTANT: Validation does not mean the address is “correct.” The UPS address validation does not necessarily check apartment, suite, or building numbers. In most cases it can only guarantee that the street exists within that city, state, and zip.

Getting Started
If you have a UPS account, you will need to request an access key from the UPS Developer website. Signing up for an account is free. In addition to getting your access credentials, you can also download the API documentation.
To continue, the three pieces of information you will need are:
- Your username
- Your password
- Your Access Key, sometimes called the ‘AccessLicenseNumber’
The UPS API has two endpoints, one for testing and one for production.
# Testing
https://wwwcie.ups.com/addressvalidation/v1/1

# Production
https://onlinetools.ups.com/addressvalidation/v1/3
The very last digit can be 1, 2, or 3.
- Address Validation: validates addresses
- Address Classification: determines if address is commercial or residential
- Address Validation and Address Classification: The same and 1 and 2 together.

Configure JSON test data, testing your credentials with Curl
JSON will be used as the interchange format, though XML will also work with a different endpoint. When you’re programming this with Perl, Python, PHP etc., you would format and pack your data into JSON in your back end. But for this Curl example, you can copy the text below and save it as ‘whitehouse.json’.
{
    "XAVRequest": {
        "AddressKeyFormat": {
            "ConsigneeName": "Mr. President",
            "AddressLine": [
                "1600 Pennsylvania Avenue North West"
            ],
            "PoliticalDivision2": "WASHINGTON",
            "PoliticalDivision1": "DC",
            "PostcodePrimaryLow": "20500",
            "CountryCode": "US"
        }
    }
}
Once your JSON test file is saved, open a terminal and navigate to the directory containing ‘whitehouse.json‘ and test it with either the Linux command, or the Windows command.
Testing validation with Curl, Linux
curl -o output.json -d @whitehouse.json \
    -H "Content-Type: application/json" \
    -H "AccessLicenseNumber: 0000000000000000" \
    -H "Username: yourusername" \
    -H "Password: yourpassword" \
    https://onlinetools.ups.com/addressvalidation/v1/3
Testing validation with Curl, Windows
curl -o output.json -d @whitehouse.json ^
    -H "Content-Type: application/json" ^
    -H "AccessLicenseNumber: 0000000000000000" ^
    -H "Username: yourusername" ^
    -H "Password: yourpassword" ^
    https://onlinetools.ups.com/addressvalidation/v1/3
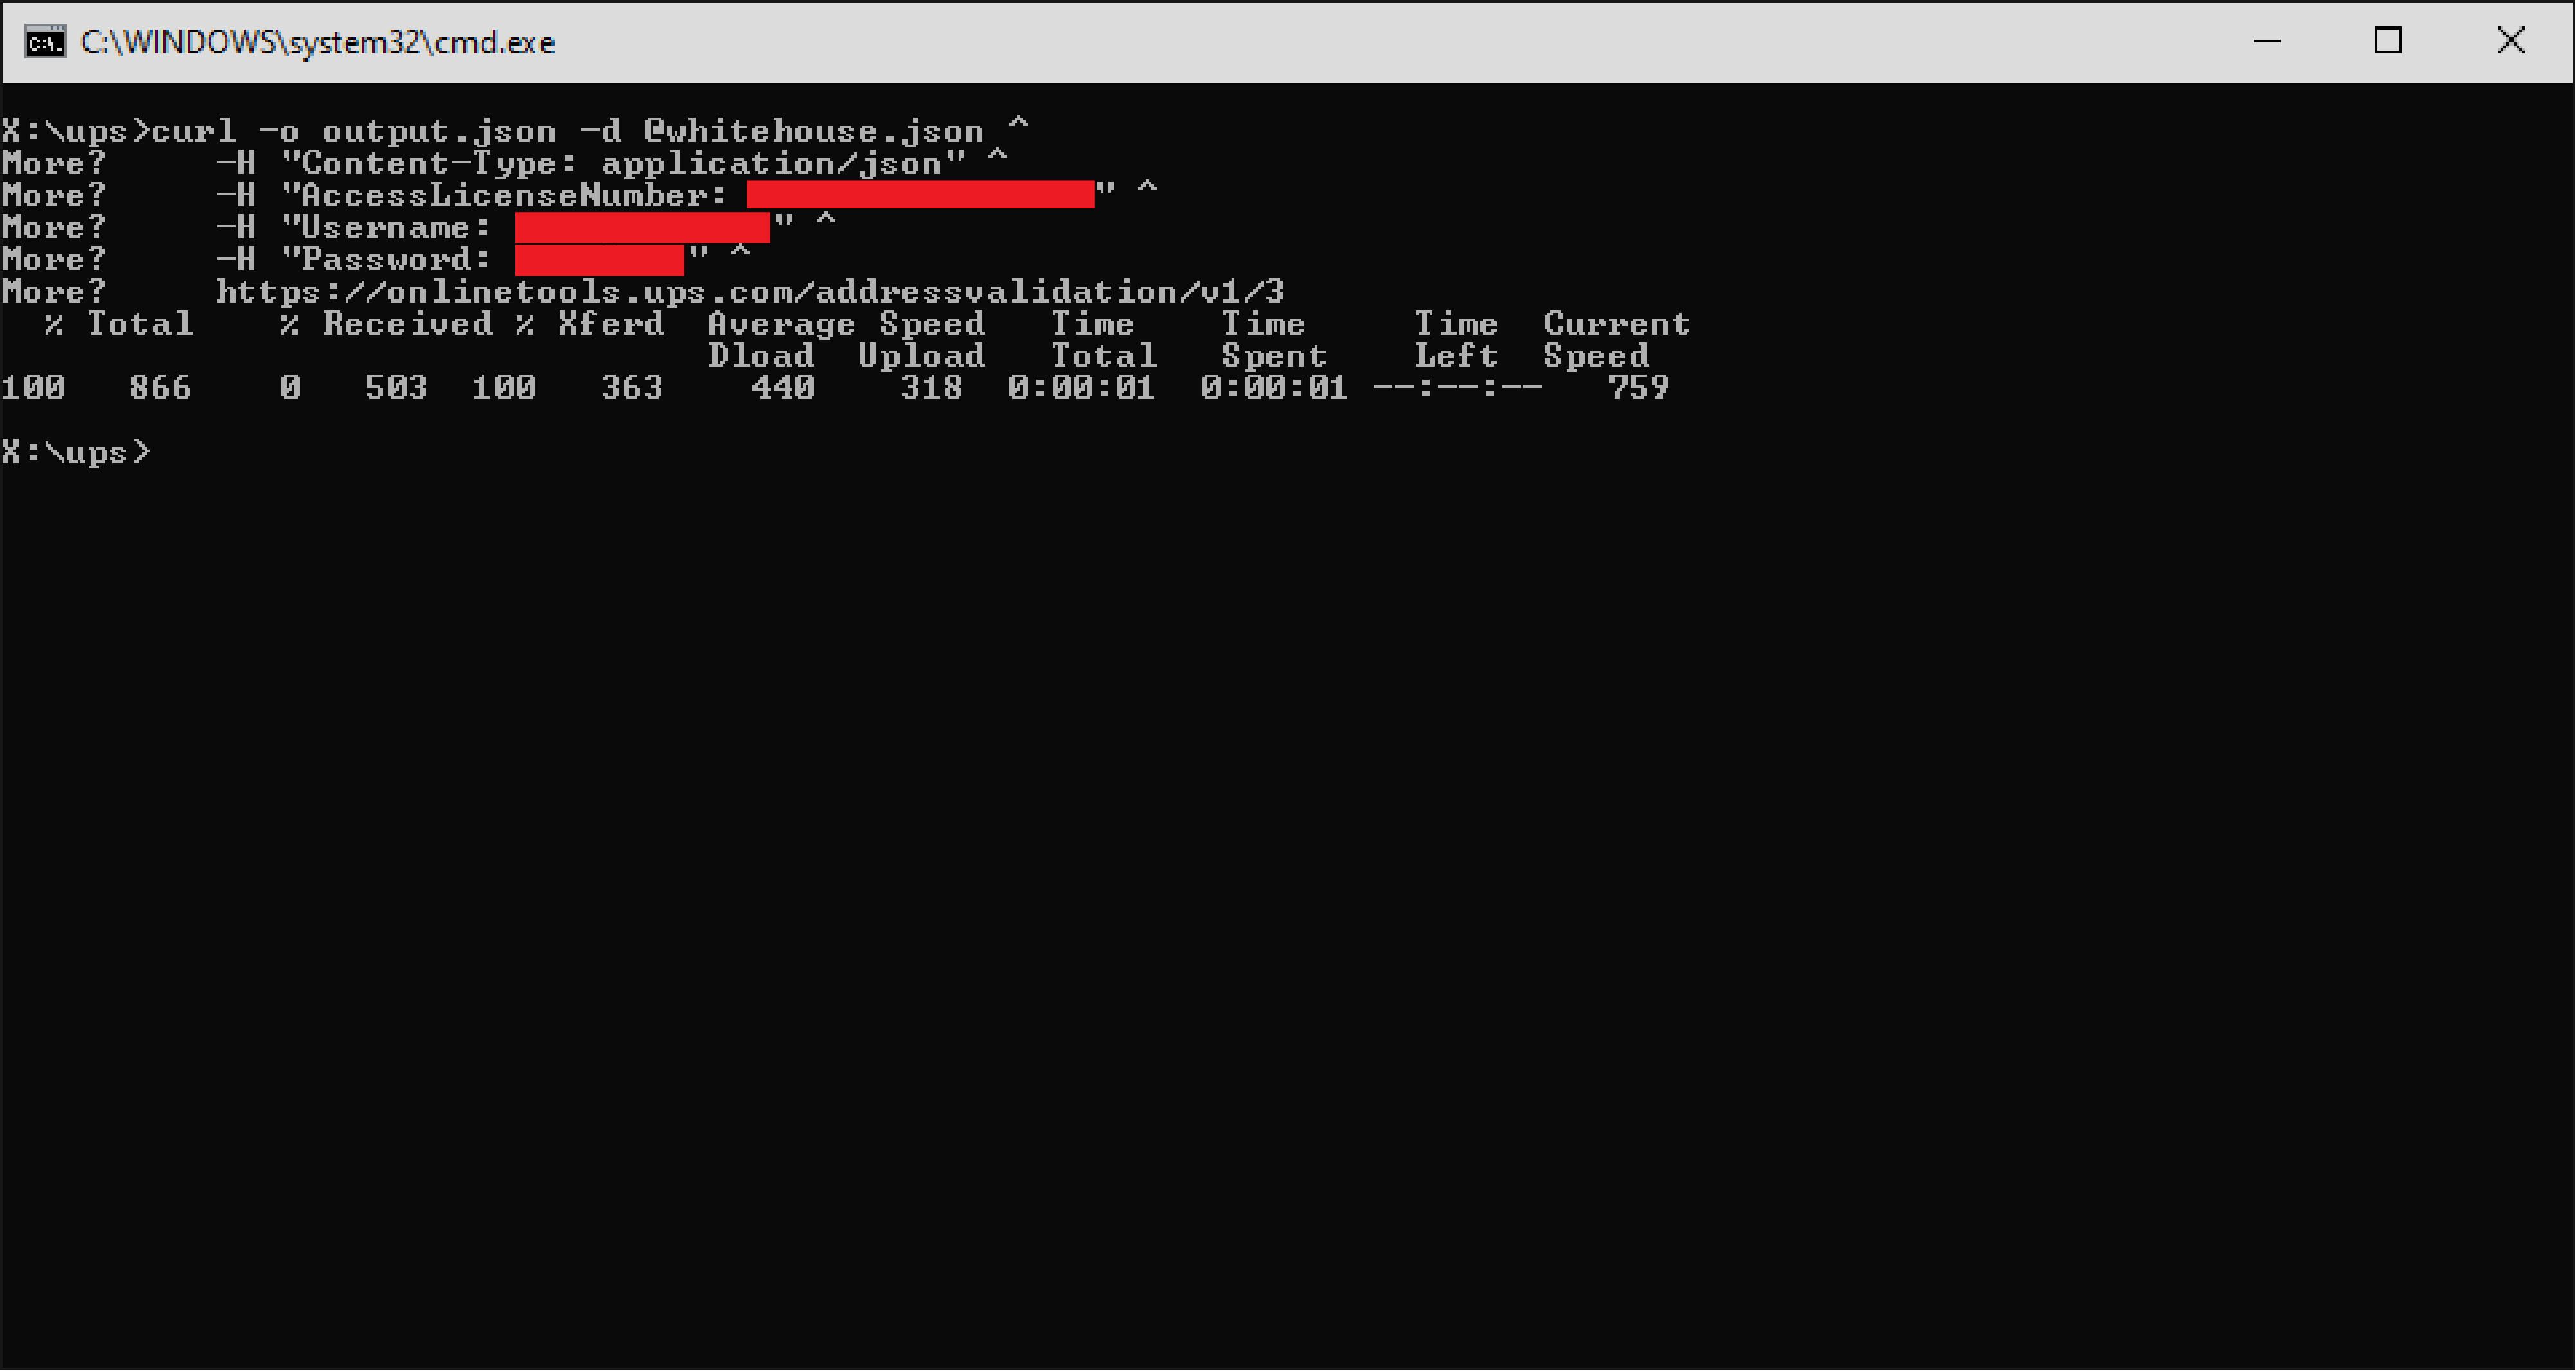
You will need to replace the credentials in these commands with your own. Once executed, you should produce a file named output.json that has an address candidate and a residential or commercial classification.
output.json: (The response from UPS)
{
    "XAVResponse": {
        "Response": {
            "ResponseStatus": {
                "Code": "1",
                "Description": "Success"
            }
        },
        "ValidAddressIndicator": "",
        "AddressClassification": {
            "Code": "2",
            "Description": "Residential"
        },
        "Candidate": {
            "AddressClassification": {
                "Code": "2",
                "Description": "Residential"
            },
            "AddressKeyFormat": {
                "AddressLine": "1600 PENNSYLVANIA AVE NW",
                "PoliticalDivision2": "WASHINGTON",
                "PoliticalDivision1": "DC",
                "PostcodePrimaryLow": "20500",
                "PostcodeExtendedLow": "0005",
                "Region": "WASHINGTON DC 20500-0005",
                "CountryCode": "US"
            }
        }
    }
}
| Original address: 1600 Pennsylvania Avenue North West WASHINGTON, DC 20500 US | New address candidate: 1600 PENNSYLVANIA AVE NW WASHINGTON, DC 20500-0005 US |
If you compare output.json to the original whitehouse.json you can see the street address has been normalized. Instead of “Avenue Northwest” we get “AVE NW.” The 5-digit ZIP code has also been changed to the 5+4 digit ZIP code.
Things to remember:
- UPS will only do street level validation. Apartment numbers, building numbers, floor numbers, suites — anything that is Address Line 2 — is never validated. You will have to save this data separately and reconcile validated address with this extra information.
- The information returned are “Address Candidates” or “best guesses.” It is not always perfect and there are times where you will receive more than one address candidate.

Code Examples
The scripting language you choose will need to be able to execute an HTTP POST request and parse the response. Credentials are packed in the ‘HEADER’ while your validation data will be the POST payload.
Below are code examples that will make a POST request to the UPS API. The response string can then be parsed by a JSON library of your choice — or if this is a web app, the JSON string can be sent to the client browser and parsed by your front-end JavaScript code.
Python
import requests
r = requests.post('https://onlinetools.ups.com/addressvalidation/v1/3',
    headers={
        "AccessLicenseNumber" : "0000000000000000",
        "Username" : "yourusername",
        "Password" : "yourpassword"
    },
    json={
    "XAVRequest": {
        "AddressKeyFormat": {
            "ConsigneeName": "Mr. President",
            "AddressLine": [
                "1600 Pennsylvania Avenue North West"
            ],
            "PoliticalDivision2": "Washington",
            "PoliticalDivision1": "DC",
            "PostcodePrimaryLow": "20500",
            "CountryCode": "US"
        }
    }
})
print r.json()
Perl
#!/usr/bin/perl

use JSON::MaybeXS qw(encode_json decode_json);
use LWP::UserAgent;

$ua = LWP::UserAgent->new(ssl_opts => { SSL_version => 'tlsv12' });
$uri = 'https://onlinetools.ups.com/addressvalidation/v1/3';

$ua->default_header('AccessLicenseNumber' => "0000000000000000");
$ua->default_header('Username' => "yourusername");
$ua->default_header('Password' => "yourpassword");

%payload = (
    "XAVRequest" => {
        "AddressKeyFormat" => {
            "ConsigneeName"         => "Mr. President",
            "AddressLine"           => ["1600 Pennsylvania Avenue North West"],
            "PoliticalDivision2"    => "WASHINGTON",
            "PoliticalDivision1"    => "DC",
            "PostcodePrimaryLow"    => "20500",
            "CountryCode"           => "US"
        }
    }
);

$jsonstring = encode_json \%payload;

$response = $ua->post($uri,Content => $jsonstring);
$address = decode_json $response->{'_content'};

print $response->{'_content'};
PHP
<?php

$ups_license    = "0000000000000000";
$ups_username   = "yourusername";
$ups_password   = "yourpassword";
$url = "https://onlinetools.ups.com/addressvalidation/v1/3";

$payload = array(
    "XAVRequest" => array(
        "AddressKeyFormat" => array(
            "ConsigneeName"         => "Mr. President",
            "AddressLine"           => ["1600 Pennsylvania Avenue North West"],
            "PoliticalDivision2"    => "WASHINGTON",
            "PoliticalDivision1"    => "DC",
            "PostcodePrimaryLow"    => "20500",
            "CountryCode"           => "US"
        )
    )
);

$json_payload = json_encode($payload);

$response = file_get_contents($url,null,stream_context_create(array(
    'http' => array(
        'protocol_version' =>   1.1,
        'user_agent'       =>   'PHP Post',
        'method'           =>   'POST',
        'header'           =>   "Content-type: application/json\r\n".
                                "AccessLicenseNumber: $ups_license\r\n" .
                                "Username: $ups_username\r\n" .
                                "Password: $ups_password\r\n" .
                                "Connection: close\r\n" .
                                "Content-length: " . strlen($json_payload) . "\r\n",
        'content'          =>   $json_payload,
    ),
)));

if ($response) {
    echo $response;
} else {
    echo "Error.";
}
?>
JavaScript, Node.js
var payload = {
    XAVRequest: {
      AddressKeyFormat: {
          ConsigneeName: "Mr. President",
          AddressLine: ["1600 Pennsylvania Avenue North West"],
          PoliticalDivision2: "WASHINGTON",
          PoliticalDivision1: "DC",
          PostcodePrimaryLow: "20500",
          CountryCode: "US"
      }
  }
};

fetch('https://onlinetools.ups.com/addressvalidation/v1/3', {
    method: 'POST',
    headers: {
        'Accept': 'application/json',
        'Content-Type': 'application/json',
        'AccessLicenseNumber' : '0000000000000000',
        'Username' : 'USERNAME',
        'Password' : 'PASSWORD'
    },
    body: JSON.stringify(payload)
})
.then(response => response.json())
.then(response => console.log(JSON.stringify(response)))
XML example with VBA
For this code to work, go to Tools > References, and check ‘Microsoft XML, v6.0’. I had some issues using the ‘testing’ endpoint, but the ‘production’ endpoint worked correctly.
Option Compare Database

Sub UPS_API()

    Dim xml_obj As MSXML2.XMLHTTP60

    Set xml_obj = New MSXML2.XMLHTTP60

    Dim myXML As String

    myXML = "<?xml version='1.0' ?>" & _
    "<AccessRequest xml:lang='en-US'>" & _
    "<AccessLicenseNumber>YOURACCESSLICENSENUMBER</AccessLicenseNumber>" & _
    "<UserId>YOURUSERID</UserId>" & _
    "<Password>YOURPASSWORD</Password>" & _
    "</AccessRequest> <?xml version='1.0' ?>" & _
    "<AddressValidationRequest xml:lang='en-US'>" & _
    "<Request>" & _
    "<TransactionReference>" & _
    "<CustomerContext>VIP Customer #123456</CustomerContext>" & _
    "</TransactionReference>" & _
    "<RequestAction>XAV</RequestAction>" & _
    "<RequestOption>3</RequestOption>" & _
    "</Request>" & _
    "<AddressKeyFormat>" & _
    "<AddressLine>1600 Pennsylvania Ave</AddressLine>" & _
    "<Region>Washington DC 20500</Region>" & _
    "<PoliticalDivision2>Washington</PoliticalDivision2>" & _
    "<PoliticalDivision1>DC</PoliticalDivision1>" & _
    "<PostcodePrimaryLow>20500</PostcodePrimaryLow>" & _
    "<PostcodeExtendedLow></PostcodeExtendedLow>" & _
    "<CountryCode>US</CountryCode>" & _
    "</AddressKeyFormat>" & _
    "</AddressValidationRequest>"

    endpoint = "https://onlinetools.ups.com/ups.app/xml/XAV"

    xml_obj.Open bstrMethod:="POST", bstrURL:=endpoint

    xml_obj.send myXML

    Debug.Print xml_obj.responseText

End Sub
Parsing the response, example in Perl
For the example below, UPS should return multiple address candidates since the address is not a close match to any known address. The script will print all candidates to standard output. The maximum number of candidates returned by UPS is 15.
#!/usr/bin/perl
# UPS JSON parsing example

use JSON::MaybeXS qw(encode_json decode_json);
use LWP::UserAgent;

$ua = LWP::UserAgent->new(ssl_opts => { SSL_version => 'tlsv12' });
$uri = 'https://onlinetools.ups.com/addressvalidation/v1/3';

$ua->default_header('AccessLicenseNumber' => "0000000000000000");
$ua->default_header('Username' => "yourusername");
$ua->default_header('Password' => "yourpassword");

%payload = ( # This payload should return multiple address candidates
    "XAVRequest" => {
        "AddressKeyFormat" => {
            "ConsigneeName"         => "JOHN DOE",
            "AddressLine"           => ["500 MAIN AVENUE"],
            "PoliticalDivision2"    => "MEMPHIS",
            "PoliticalDivision1"    => "FL",
            "PostcodePrimaryLow"    => "33101",
            "CountryCode"           => "US"
        }
    }
);

$jsonstring = encode_json \%payload;

$response = $ua->post($uri,Content => $jsonstring);
$content = decode_json $response->{'_content'}; # Main response content (JSON string)

# Check for the existence of multiple candidates
# Candidate address(es) will either be a single HASHREF, or ARRAY of HASHREFS
if( ref $content->{'XAVResponse'}{'Candidate'} eq 'ARRAY'){
    $count = @{$content->{'XAVResponse'}{'Candidate'}};
    print "$count address candidates\n\n";
    $count=1;
    foreach $candidate (@{$content->{'XAVResponse'}{'Candidate'}}){
        # Check for multi-line address
        if(ref $candidate->{'AddressKeyFormat'}{'AddressLine'} eq 'ARRAY'){
            print "$count > ";
            foreach $line (@{$candidate->{'AddressKeyFormat'}{'AddressLine'}}){
                chomp $line;
                print "$line ";
            }
        }
        else{ # Single address line
            print "$count > $candidate->{'AddressKeyFormat'}{'AddressLine'}";
        }
        print ", $candidate->{'AddressKeyFormat'}{'Region'}\n";
        $count++;
    }
}
else{
    # else $content->{'XAVResponse'}{'Candidate'}
    # is a HASH REF of one candidate
}
Example Address Form
Enter any US address to validate
Tracking Integration
Package tracking information can also be accessed using your developer credentials. Documentation is located on the UPS Developer Kit website. This API has two endpoints:
# Testing
$uri = "https://wwwcie.ups.com/rest/Track";

# Production
$uri = "https://onlinetools.ups.com/rest/Track";
Test tracking file, payload.json
{
    "UPSSecurity": {
        "UsernameToken": {
            "Username": "yourusername",
            "Password": "yourpassword"
        },
        "ServiceAccessToken": {
            "AccessLicenseNumber": "0000000000000000"
        }
    },
    "TrackRequest": {
        "Request": {
            "TransactionReference": {
                "CustomerContext": "Automated Query"
            },
            "RequestOption": "1"
        },
        "InquiryNumber": "1Z0000000000000000"
    }
}
Modify the above code with your UPS credentials and save it as payload.json and test with the Curl commands below. Be sure to test a valid tracking number also.
Again, this JSON file is for testing. The ideal implementation would not use an intermediate JSON file — you would encode and decode JSON on-the-fly.
Test tracking with Curl, Linux
curl -o output.json -d @payload.json \
    -H "Content-Type: application/json" \
    https://onlinetools.ups.com/rest/Track
Test tracking with Curl, Windows
curl -o output.json -d @payload.json ^
    -H "Content-Type: application/json" ^
    https://onlinetools.ups.com/rest/Track
Tracking example code, JavaScript/Node.js
var payload = {
    UPSSecurity: {
        UsernameToken : {
            Username : 'username',
            Password : 'password'
        },
        ServiceAccessToken : {
            AccessLicenseNumber : '0000000000000000'
        }
    },
    TrackRequest : {
        Request : {
            RequestOption : '1',
            TransactionReference : {
                CustomerContext : 'Automated Query'
            }
        },
        InquiryNumber : '1Z0000000000000000'
    }
};

fetch('https://onlinetools.ups.com/rest/Track', {
    method: 'POST',
    body: JSON.stringify(payload)
})
.then(response => response.json())
.then(response => console.log(JSON.stringify(response)))
Tracking example code, Perl
#!/usr/bin/perl

use JSON::MaybeXS qw(encode_json decode_json);
use LWP::UserAgent;

$ups_license    = "0000000000000000";
$ups_username   = "yourusername";
$ups_password   = "yourpassword";

$trackingno = '1Z0000000000000000';

$upspayload{'UPSSecurity'}{'UsernameToken'}{'Username'} = $ups_username;
$upspayload{'UPSSecurity'}{'UsernameToken'}{'Password'} = $ups_password;
$upspayload{'UPSSecurity'}{'ServiceAccessToken'}{'AccessLicenseNumber'} = $ups_license;

$upspayload{'TrackRequest'}{'Request'}{'RequestOption'} = "1";
$upspayload{'TrackRequest'}{'Request'}{'TransactionReference'}{'CustomerContext'} = "Automated Query";
$upspayload{'TrackRequest'}{'InquiryNumber'} = $trackingno;

$json = encode_json \%upspayload;
$ua = LWP::UserAgent->new(ssl_opts => { SSL_version => 'tlsv12' });

$uri = "https://onlinetools.ups.com/rest/Track";
$response = $ua->post($uri,Content => $json);

print $response->{'_content'};
The response from UPS can have a lot of information packed into it. Detailed tracking information such as package location, timestamps, and other messages will have to be iterated and error messages will need to be handled by your code.
It may also include things like:
- Other tracking numbers associated with that package
- Scheduled delivery date
- Actual delivery date
- Delivery location (front desk, dock, etc.)
- Name of person who accepted the package
Example tracking form
Final Thoughts
- Addresses returned by UPS Validation can also be used with other carriers, such as FedEx and USPS. Addresses are valid regardless of what company is making the delivery.
- UPS assumes no liability when performing address validation. In the end, the shipper and/or customer is ultimately responsible for providing accurate addresses and UPS Validation is only a tool to help meet that end.
Address validation can help identify typos and data input errors, but by no means is it a catch-all tool. If used in an e-commerce environment it should alert the customer when a problem is detected and prompt for actions to be taken.